
Winging it - Sailing with a winged rudder
by Graham Camm 15 Nov 2019 12:00 GMT
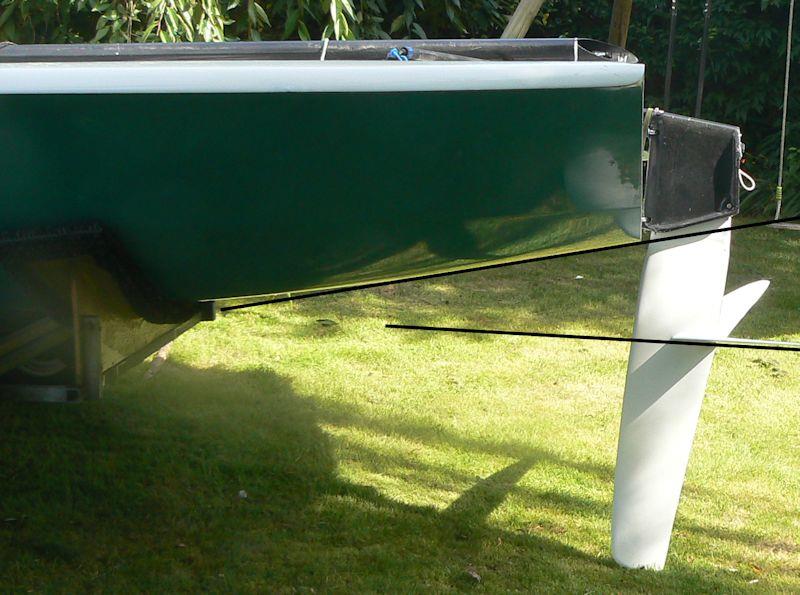
Measuring the angle of a winger rudder by editing a photo to draw lines © Graham Camm
Winged rudders have been mainstream in the National 12 class since around 2010. They provide a number of benefits including: allowing the 12 to carry a little more crew weight as they provide lift at the transom, increasing straight line speed in certain conditions, and acting as a stabiliser on high speed reaches and runs. They also smooth the transition from displacement sailing to planing. On the latest generation of foiling National 12 the wings start to work above about 4 knots of breeze and 2 knots of boatspeed meaning they are working in most sailing conditions.
There are many flying foiling classes these days where wings are fitted on both the rudder and daggerboard. On these classes the wings are trying to promote flight and, once out of the water, the hull is almost irrelevant. On the National 12 the wings are attached purely to the rudder and operate in the stern wave of the hull at all times. This concept is quite different to the fully-foiling boats as the hull and wings are interacting all the time.
To get the most out of the wings National 12 sailors have discovered that there are some new sailing techniques to learn. This guide gives some tips on how to harness their power of the wings and avoid them being a hindrance. The principles should apply to any non-flying dinghy that has rudder-mounted foils that are operating close to the surface.
How do they work?
First of all let's take a look at how the wings work; an appreciation of this will help you apply the sailing techniques and adjust the wings to the optimum position. If you look at the position of the wing on the rudder you'll see that they are generally close(ish) to the waterline meaning they sit in the stern wave. This results in the direction of water flow over the wing altering as the stern wave shape changes - as boat speed increases and decreases.
This change in water flow with speed is shown in the diagrams below. The series of pictures also show how the rudder tip is tilted forwards at low speeds making the wing horizontal and more in line with the flow. The rudder is rotated backwards, moving the tip further back, as speed increases and the amount of lift from the foil needs tempering.
At very low speeds the flow will be near horizontal. The rudder is tilted forwards.
As the boatspeed approaches the 'hull speed' the flow will have a greater vertical component. The rudder is rotated back a little but still has a high angle of incidences between the foil and the water flow that provides plenty of lift.
Definition of 'Hull Speed': According to Frank Bethwaite, at hull speed, the wave crest is exactly on the transom. The crest moves further aft as the speed increases with a massive increase in drag (what Bethwaite calls the 'forced mode') until the hull starts planing. In 'forced mode' the boat is effectively sailing up-hill until it can get on the plane. It is in this range between hull speed and planing where the wake reaches its greatest with the stern wave resembling a rooster tail (having a corresponding large upward component in the flow).
Finally at planing speeds the flow will flatten out again. The rudder is tilted backwards to reduce the angle of incidence between the foil and flow to temper the lift.
The diagram below shows the angle of attack that the water flow makes with the wing. The red line shows the horizontal. The brown line shows the angle of the wing relative to the horizontal. Note that the wing is pointing under the horizontal, yet it may still generate lift as the water flow (black line) is coming upwards at a steeper angle.
The black line is the water flow. The angle of attack that the water flow makes with the wing is the difference between the brown line (wing angle down) and the black line (water flow up). As the angle of attack increases more lift is generated until the point that the wing stalls and the flow detaches - at which point the lift rapidly reduces.
The image below shows a computational fluid dynamics (CFD) study with the National 12 making 6 knots and a wing in the flow.
The charts below illustrate how the lift and drag forces change with both speed and angle of attack of the wing with the water flow. The coloured lines represent the different speeds, and the x-axis (Alpha) is the angle of attack in degrees.
Calibration
Before you start adjusting your wings it is important to know what your wing angle is for a given setting. You can then mark off positions so you can readily set the wing to a known angle. A good way to calibrate the wings is to take a photo from the side with the rudder mounted and at different angles. You can then use photo editing software to superimpose lines and see what angle your wings make with the hull.
This is the winged rudder on 3530 'Very Hungry Caterpillar' (a Dead Cat Bounce design). The upper black line shows the hull angle (the water will be flowing in the direction of the hull angle) and the lower black line shows the wing angle with the rudder pulled fully "on" (i.e. tilted forwards).
Straight line - Upwind sailing
The wing position needs adjusting according to the conditions with the optimum wing position depending on the boat speed and how choppy the water is.
In very light winds the foil doesn't affect the straight line boat speed much. There is a small amount of drag but the wing sections are pretty efficient at slow speeds. In flat water and medium winds the wings can be pulled hard on. As the wind picks up then the wings can be let off to reduce drag and avoid digging the nose in. As it gets choppier then the wings are eased further to allow the boat to ride over the waves and avoiding them trying to push the nose into the water.
The best settings will depend on the wing profile, hull design and your crew weight, but the general pattern for upwind is:
- Very light; wings slightly off the max position. Your aim is to set them in the lowest drag position
- Light to Moderate; wings hard on for maximum lift
- Windy / Choppy; wings steadily go off to reduce drag (more lift not required).
With the additional lift from the wing, the helm and crew can (and should) sit further back in the boat compared to sailing with a non-winged rudder. Boats designed to work with a winged rudder have the thwart positioned further back so the helm and crew are using toe straps in the right place. If your boat has a retro-fit wing and the thwart hasn't been moved then bear in mind that you will need to sit further back than usual - this takes some getting used to as old seating habits are hard to break.
Helm and crew sat slightly back compared to a non-winged 12 (above).
When the wings are set there should be little need to adjust them when sailing upwind. It is only if there is a big change in speed or wind strength that you should need to adjust them.
Straight line - Downwind sailing
The T-foil has a stabilising effect; in other words, the faster you go the more stable the boat feels. The generation of 12s before the Dead Cat Bounce (DCB) design seemed to have an upper speed ceiling of around 14 knots above which maintaining control became tricky, often resulting in a capsize to windward, leeward or bow first. With the T-Foil there is a much smoother transition from displacement sailing mode to planing mode and there doesn't appear to be a speed ceiling.
For downwind sailing the wing settings follow a similar pattern to upwind, the main difference being that the boat is generally travelling faster downwind so the wings are naturally generating more lift and may therefore need to be backed off more. Also the waves tend to be behind you, so compared with upwind there is less of a concern about the wings pushing the boat into the waves rather than over them.
Again, the best settings will depend on the wing profile, hull design and your crew weight, but the general pattern for downwind is:
- Very light; wings slightly off maximum
- Light; wings hard on for maximum lift
- Moderate; slightly off maximum
- Windy; wings go off as required to keep the nose out, sometimes a long way off very quickly in a big gust
In marginal planing conditions, even though you can let the wings off to control the trim, in the first instance it is worth moving to the back of the boat as you get on the plane, then start to let the wings off. Keep the wings on as long as you can.
Helm and crew sat well back, wing adjusted so the bow is clearing the waves (above).
For downwind sailing more frequent adjustment of the wings is likely. As gusts come the wings may need to be let off and as gusts disappear then the wings may need to be pulled back on. There is a balance here: don't get fixated with adjusting the wings to the detriment of sailing tactically, make sure you keep an eye out for gusts, waves and other boats to maintain your speed and position in the fleet.
On a final point, you'll know if the wings are too hard on because either the nose will be pushed down or there will be air-pockets / ventilation visible on the wings, look for the water flow separating and air-bubbles coming off the wings. If either of these happens then ease off the wings until it stops, when the ventilation stops you'll feel the boat pick up speed again.
Tacking
Tacking is the manoeuvre where you really notice the wings and if not careful they can slow you down significantly. The trick to this manoeuvre is to use smooth and gentle movements to maintain the speed whilst tacking. This may take some practice to get right.
Points to note:
- Rocking and rolling is slow. If you tip the boat from side to side wildly, or wiggle the rudder madly then you'll very quickly find that the boat stops as the wings create a lot of drag.
- You have three rudders now! As the boat heels through the tack then the near side wing ends up more vertical. Essentially the wing becomes another rudder, it stops creating vertical lift and becomes a steering foil.
- Watch for the pop-out. With most winged rudders on National 12s the wing is mounted around 200mm to 250mm below the waterline. At this height the leeward wing will pop out of the water on the tack and then dip back in when the boat is pulled up on the new tack. The pop-out isn't detrimental and in fact reduces the wing drag thereby helping the boat turn.
When tacking use as little rudder as possible; and avoid rolling the boat too vigorously as this affects the flow over the foil causing drag. Try to steer a path so the wings follow a gentle curve through the water rather than a 90 degree turn.
With the boat heeled coming out of the tack, try and bring the boat up slowly so the boat accelerates forwards as the wing goes gently into the water. This helps the flow re-attach quickly onto the wing. Avoid slamming the wing down into the water as that causes drag.
Gybing
In most cases the wings help you get around the gybe, particularly as they can prevent nose diving, but with all that foil surface area at the back of the boat when you go into the gybe the wings can start steering you (they become part of the vertical foil) and they can also 'catch', stall out and send you in the drink.
If it is honking then consider easing off the wings another 10mm (4 or 5 degrees) approximately, just for the gybe to give you some tolerance to nose diving.
To get through the gybe, the principle is similar to tacking; try to use as little rudder as you can. Avoid rolling or righting the boat too vigorously as this affects the flow over the foil and try and let the wings follow a gentle curve through the water.
Launching
Most of the winged rudders in use are rotational lifting rudders. This is great for handling on the shore and also means the rudder can be in a raised position for launching thereby avoiding the need to wade into freezing cold water up to your waist/neck to fit the rudder (as has to be done in many foiling classes).
The trick when sailing off the beach is that the rudder either needs to be fully up or fully down, there is no good half-way position. Control of the boat is tricky with the rudder fully up so it is best to keep the speed low and the boat flat to avoid the wings digging in. Speed can be kept low by keeping the crew weight in the middle of the boat. Wait until you have enough depth, slow the boat and pull the rudder fully down in one move.
Coming ashore
The T-foil has a couple of effects on coming ashore. The first is that as soon as the wing comes up there is a lot of drag so the boat slows rapidly, at this point the rudder needs to be fully raised so that the wings poke out of the water allowing you to maintain forward movement (again, there is no good half-way position). Having lifted the rudder it is tricky to steer, more so than with a normal rudder. As soon as you heel the boat over, one of the wings goes back in the water slowing you further.
The best plan is to:
- Leave raising the rudder to the last possible moment
- Sail slowly once the rudder is up
- Avoid aiming for tight gaps on the shoreline
- Wait until there is plenty of space on the shore
The second effect is the change in balance of steering; you'll notice this if you drop the mainsail whilst sailing. With a normal non-winged rudder you can drop the main and sail around on the jib OK, making headway upwind and downwind. This is not the case with a winged rudder; instead, when the mainsail is dropped the boat wants to turn around the rudder, making going upwind under the jib alone difficult. Keep in mind that if you plan to drop the main to come ashore it is best to do this when you are upwind of your final destination, so you can sail downwind under jib alone to the shore.
Happy foiling!