Edition


-(1)-202408140552.gif)


Laser hull damage |
Post Reply 
|
| Author |
 Printable Version Printable Version Delicious Delicious Digg Digg Facebook Facebook Furl Furl Google Google MySpace MySpace Newsvine Newsvine reddit reddit StumbleUpon Translate StumbleUpon Translate Twitter Twitter Windows Live Windows Live Yahoo Bookmarks Yahoo Bookmarks Topic Search Topic Search  Topic Options Topic Options
|
yorkie 
Newbie 
Joined: 17 Dec 11 Location: Fareham, Hants Online Status: Offline Posts: 9 |
 Post Options Post Options
 Quote Reply Quote Reply
 Topic: Laser hull damage Topic: Laser hull damagePosted: 17 Dec 11 at 7:27pm |
|
Hi all,
after damaging the front of my laser on its trolley i plan in repairing it over the xmas break can anyone tell me the best way of doing so, can i just fill with gelcoat or do i need to build up with something else first an can this be done out side? i was thinking of applying heat using a halogen work light to help it dry, many thanks in advance for anyones help, Jon 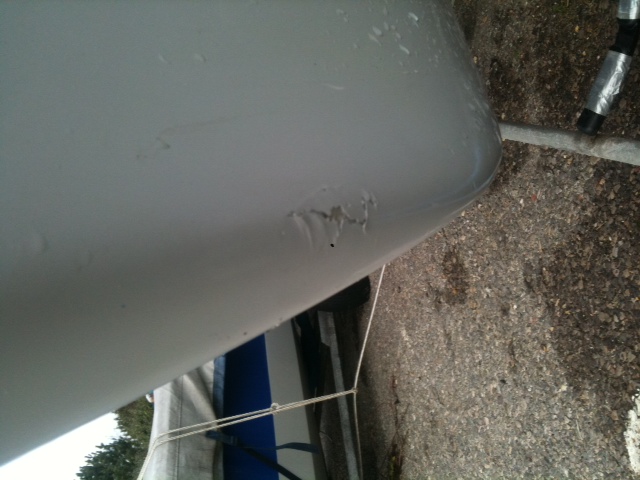 |
|
|
Laser 180945
Hill Head SC |
|
 |
|
|
dave.blakesley
Far too distracted from work 
Joined: 25 Mar 08 Location: United Kingdom Online Status: Offline Posts: 314 |
Post Options
Quote Reply
Posted: 17 Dec 11 at 8:32pm |
|
Can you give us some more information regarding how deep the damage is? It isnt clear from the photograph. if it is through the fibreglass then you will need to reinforce the hole with some CSM, if not, and the fibreglass is undamaged, just a chunk out the gelcoat then it should be a relatively easy process.
Ensure the boat is dry, dremel out the affected area, apply gelcoat and then enjoy the sanding! Best place to buy the gelcoat from is direct from laser - "Vela Grey". |
|
|
|
|
radixon
Really should get out more 

Joined: 27 Oct 06 Location: United Kingdom Online Status: Offline Posts: 2407 |
Post Options
Quote Reply
Posted: 17 Dec 11 at 10:05pm |
|
I did a similar thing to my Laser, it doesnt look that deep however I would do some reading up first.
Preparation is key, if this is your first repair, you may want to seek advice from club members. Ring up Laser and get the correct colour for your hull, and make sure that you are in when it comes, it has to be sent via courier.... |
|
|
|
|
Andymac
Really should get out more
Joined: 04 Apr 07 Location: Derbyshire Online Status: Offline Posts: 852 |
Post Options
Quote Reply
Posted: 18 Dec 11 at 8:35am |
|
Ditto Radixon;
Preparation is key (there's a pun in there somewhere). Assuming it is just gelcoat damage, you will need to remove the whole area with all the jagged shards back to where it is 100% sound, i.e. you need to make it worse before you make it better. It needs to be DRY/CLEAN and grease free. A little wipe with acetone will degrease and remove any dust. It would be wise to check with Laser re colour. It looks like a later model 'Vela Grey' but previous colour from around 130,000 to 160,000 ish was 'Dawn Grey'. As well as the correct gelcoat & catalyst, you will most importantly need a waxy additive (sometimes called 'flocoat') http://stores.ebay.co.uk/MB-Fibreglass/Wax-Solution-/_i.html?_fsub=966848017&_sid=869123677&_trksid=p4634.c0.m322 otherwise the surface of the gelcoat exposed to air will remain tacky. I don't believe Laser supply the gelcoat 'flocoated'. When GRP boats are built in a mould, the gelcoat is the first layer applied and the surface remains tacky before being covered by the matting layers. If It was only a little chip on a gunwhale you can exclude air by putting a little selotape over the fill. It is then a case of painting on in layers (building up) when dry rubbing down high spots between coats. If you try and dollop too much on in one go, the weight of the gelcoat will sag and run off. The finishing is the most laborious, rubbing down progressively with finer grade wet and dry then finishing with a very fine cutting compound i.e. 'T-cut'. Polish to complete. NB; The ambient temperate should ideally be at least 10-15 Centigrade when using the resins. You could get by using additional catalyst in low temperature but I would not dream of trying if the temperate is less than 5 Centigrade.
|
|
|
|
|
yorkie
Newbie
Joined: 17 Dec 11 Location: Fareham, Hants Online Status: Offline Posts: 9 |
Post Options
Quote Reply
Posted: 18 Dec 11 at 1:24pm |
|
Thankyou all for the brilliant answers, I've an uncle with a large heated garage/workshop, I'll ask if I can repair it in there,
|
|
|
Laser 180945
Hill Head SC |
|
|
|
|
simsy
Posting king 
Joined: 14 Jun 05 Location: United Kingdom Online Status: Offline Posts: 158 |
Post Options
Quote Reply
Posted: 18 Dec 11 at 8:57pm |
This is very sound advice. Andy's point about temperature is key, by the looks of the photo - the damage looks cosmetic and is just the gelcoat. |
|
|
|
|
Stuart O
Really should get out more

Joined: 22 Jul 07 Online Status: Offline Posts: 514 |
Post Options
Quote Reply
Posted: 28 Dec 11 at 7:44am |
|
If its not something you want to try, Zest Racing is at Hedge End and Pete there will do a grand repair at a good price
|
|
|
|
|
dave.blakesley
Far too distracted from work
Joined: 25 Mar 08 Location: United Kingdom Online Status: Offline Posts: 314 |
Post Options
Quote Reply
Posted: 29 Dec 11 at 12:43pm |
|
NB - Laser DO provide their gel coat pre - waxed. It will not be necessary to purchase any additional wax. The gelcoat will also come with the MEKP hardener (just dont get it in your eyes!)
|
|
|
|
|
Andymac
Really should get out more
Joined: 04 Apr 07 Location: Derbyshire Online Status: Offline Posts: 852 |
Post Options
Quote Reply
Posted: 29 Dec 11 at 12:57pm |
Thanks for that Dave.. I stand corrected if that is the case. I must admit I've got an old batch which I am still using which does require additional wax additive if it is to cure properly. On more than one occasion I have witnessed people doing gelcoat touch ups (with whatever brand/supply gelcoat) and being perplexed when it does not 'dry' properly. The last occasion was earlier this year when my boat park neighbour was touching up the bow on his L2000 (I don't know whether the gelcoat was supplied by Laser or how old it might have been). I put him right in using some selotape.
|
|
|
|
|
FCDB
Newbie
Joined: 11 Jan 09 Online Status: Offline Posts: 10 |
Post Options
Quote Reply
Posted: 30 Dec 11 at 5:14pm |
|
If you are reasonably practical this doesn't look too difficult to sort out, especially if you can use a warm garage to do the work.
Andymac has it pretty much sorted out, but a few extra hints below: If you want to practice mixing and applying gel coat, have a go on a piece of ply and leave it to set overnight before trying the proper job. To do the job, mask off around the area of hull where you are working with masking tape and tape some polythene around the outside area. this will give protection in case you spill anything. Then clean up the damage, and remove the damaged gelcoat, carefully use a sharp chisel or fine file. Chamfer the edges with some medium sandpaper. Remove dust. Then prepare a patch of polythene to go over the area to be re-gelcoated. A medium weight freezer or sandwich bag is about the right gauge although I have used clingfilm when nothing else was available. Before mixing get everything prepared. Wear disposable plastic gloves, it keeps everything so much cleaner. Then mix the gelcoat, be very precise with the proportions of resin and hardener. Read the tin, do the maths, then do the mixing. Too much or too little hardener messes up the setting. I have used the medicine spoons you get with cough mixture to get the ratio right. (Chuck spoons away once used.) Mix the gelcoat in a dry paper cup, use a lolly stick or plastic spoon to mix. Allow about 4 minutes for the reaction to start in the cup and then carefully apply the gelcoat to the repair area. Once the gelcoat is in place, carefully lay the pre cut polythene over the gelcoat and smooth it down. Then lightly tape over it, and around the edges. Keeping the air off the gelcoat will let it set. The polythene will help keep it smooth. Leave the gelcoat to harden off overnight. Be patient. Tidy up. Next day, peel off the polythene. You should have a reasonably smooth gelcoat repair. Then lightly wet sand the repair using 400 grade 'wet-or-dry' sandpaper. (From B&Q or Halfords or a proper chandlery, such as Chris Hornsey in Portsmouth) The paper should be wrapped around a small wooden block ( about 100mm x 50mm x 15mm). This keeps the paper firm and fairs the repair. Once you have got the repair faired, then polish it with 1000 (thousand) grade wet-or-dry paper. And for a super finish polish with car cutting compound. Enjoy. |
|
|
|
|
Post Reply
|
| Forum Jump | Forum Permissions You cannot post new topics in this forum You cannot reply to topics in this forum You cannot delete your posts in this forum You cannot edit your posts in this forum You cannot create polls in this forum You cannot vote in polls in this forum |
Bulletin Board Software by Web Wiz Forums® version 9.665y
Copyright ©2001-2010 Web Wiz
Change your personal settings, or read our privacy policy
Copyright ©2001-2010 Web Wiz
Change your personal settings, or read our privacy policy