


-202403121604.gif)


| J24 (Sail No. 4239) Dartmouth |
 |
| Laurent Giles 'Jolly Boat' Exeter |
 |
| Laser XD 203301 Upminster |
 |
List classes of boat for sale |


your opinions please |
Post Reply 
|
Page 12> |
| Author |
 Printable Version Printable Version Delicious Delicious Digg Digg Facebook Facebook Furl Furl Google Google MySpace MySpace Newsvine Newsvine reddit reddit StumbleUpon Translate StumbleUpon Translate Twitter Twitter Windows Live Windows Live Yahoo Bookmarks Yahoo Bookmarks Topic Search Topic Search  Topic Options Topic Options
|
landlocked 
Far too distracted from work 

Joined: 06 Oct 06 Location: United Kingdom Online Status: Offline Posts: 222 |
 Post Options Post Options
 Quote Reply Quote Reply
 Topic: your opinions please Topic: your opinions pleasePosted: 09 Sep 07 at 7:19pm |
|
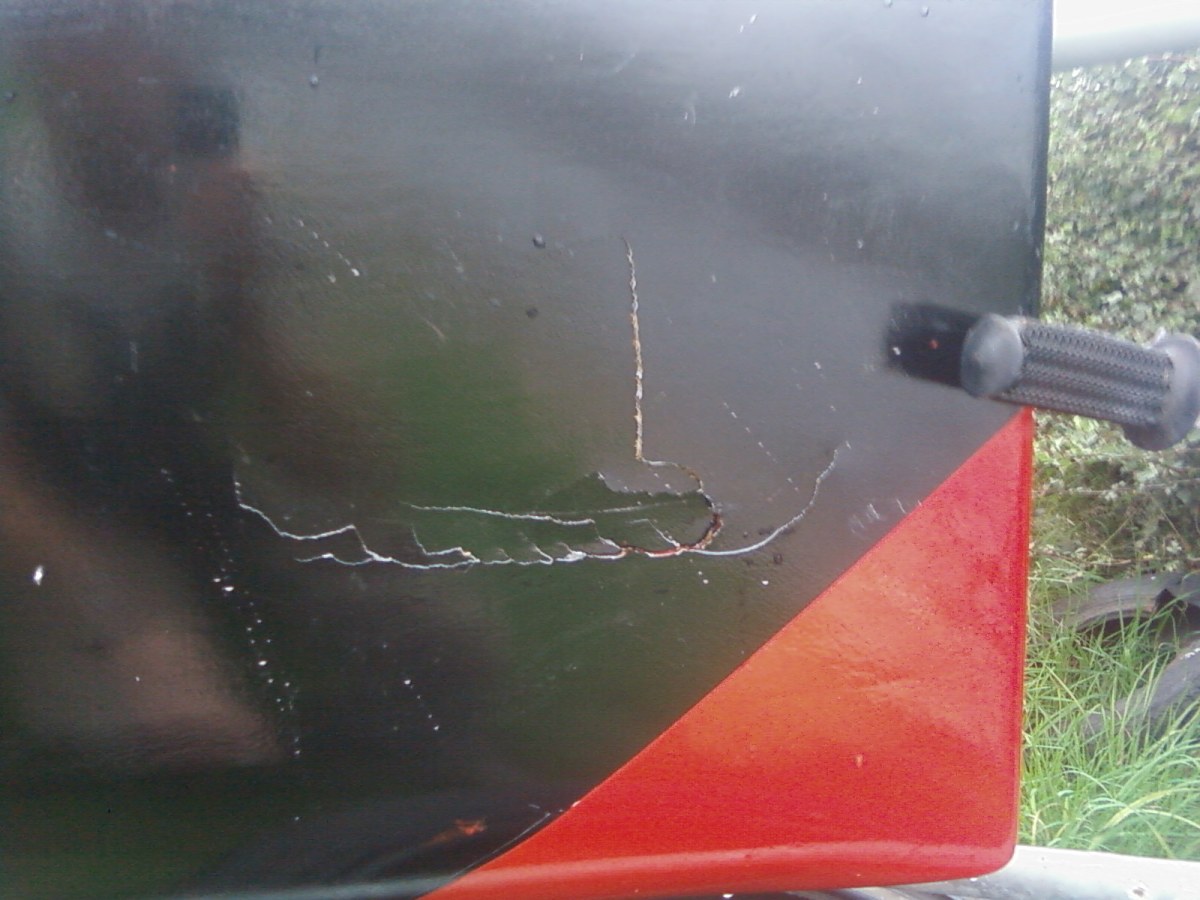
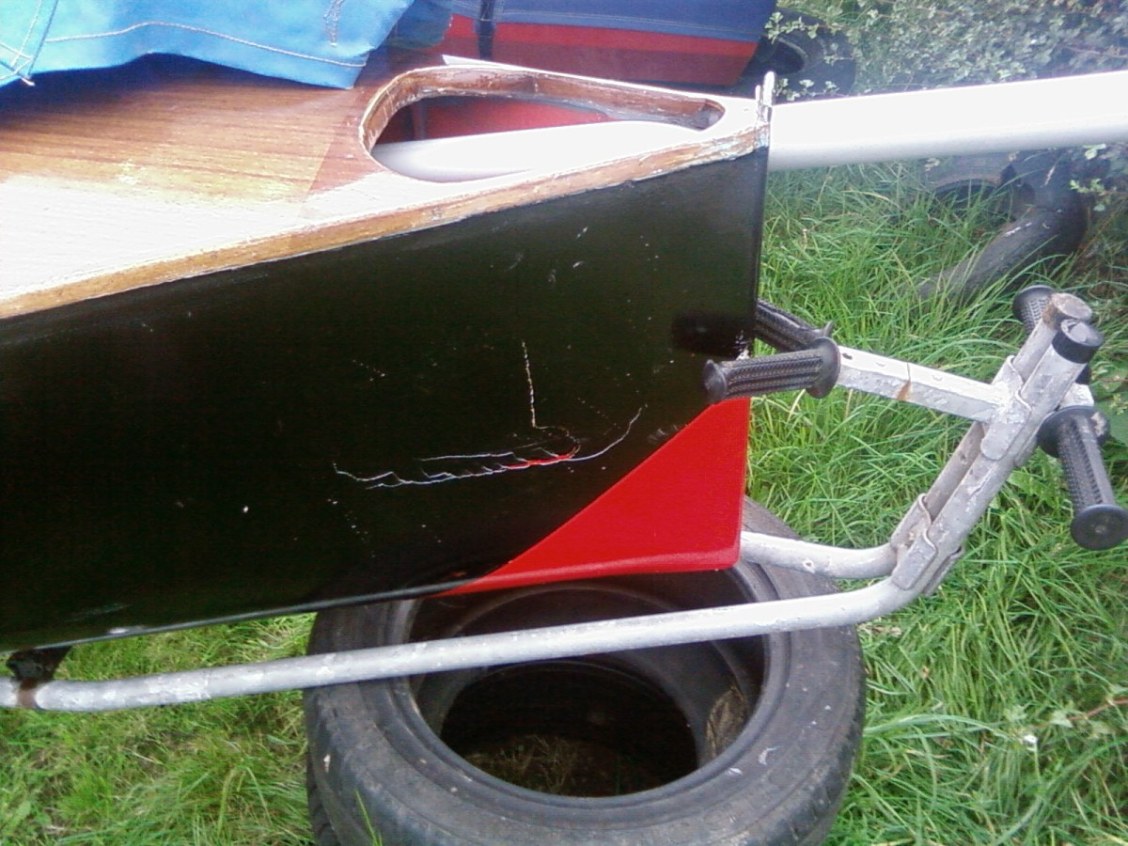
Very gusty short startline and this is the result what do you guys recon is the best way to repair. It is only the skin it does not go into the front tank.
  Edited by landlocked |
|
|
Cherub 2535 "Eggbert the Nasty" Soon to be for sale PM for Details
Cherub 2657 "Slippery When Wet" Don't sail fly Cherub |
|
 |
|
|
Isis
Really should get out more 

Joined: 01 Sep 05 Online Status: Offline Posts: 2753 |
Post Options
Quote Reply
Posted: 09 Sep 07 at 8:03pm |
|
Ooops!
You basicaly need to neatly remove all the outer skin and core surrounding the damage and replace it with new foam/glass (im guessing eggbert is glass?) If the inner skin is naffed too that needs to be reinforced before the new core goes back in.... Theres a more in depth explaination on the cherub website somewhere but thats about the jist of it. If your not sure about doing it yourself (its not too challenging to do, but pretty tough to do neatly and seamlessly) I think theres a class sticky weekend comming up with space for you to bring the boat down and have some more experianced cherrubers lend a hand. Edited by Isis |
|
|
|
|
landlocked
Far too distracted from work
Joined: 06 Oct 06 Location: United Kingdom Online Status: Offline Posts: 222 |
Post Options
Quote Reply
Posted: 09 Sep 07 at 8:26pm |
|
it's wood about 2-3mm ply have had a few suggestions from others at the club but wanted as many options as posibble and then go for the best when is the next sticky weekend might be up for that anyway
|
|
|
Cherub 2535 "Eggbert the Nasty" Soon to be for sale PM for Details
Cherub 2657 "Slippery When Wet" Don't sail fly Cherub |
|
|
|
|
Isis
Really should get out more
Joined: 01 Sep 05 Online Status: Offline Posts: 2753 |
Post Options
Quote Reply
Posted: 09 Sep 07 at 8:50pm |
|
Ah. In that case I cant help im afraid...
The next sticky weekend is the 17th and 18th of novemeber in weston super mare. |
|
|
|
|
Paramedic
Really should get out more
Joined: 27 Jan 06 Location: United Kingdom Online Status: Offline Posts: 929 |
Post Options
Quote Reply
Posted: 09 Sep 07 at 9:45pm |
|
This assumes you are right and it is only the outer veneers that are damaged. It looks worse to me but it's hard to tell without seeing the boat in the flesh Remove the paint from the damaged area. Turn the boat on it's side. Take some west 105 / SP 106 get it really warm and saturate the damaged area. You need to get the resin to run into all the little cracks. Once you have done that mix some micro balloons or fibres into what's left and use it to fill the dent. Apply masking tape over the top to hold it in, roll the boat back over and await curage. Then sand back and repain as required. A better but harder way is to use a router to remove a square of the ply 1.5mm deep and glue a piece of 1.5mm ply into the hole. This works well on a flat surface but is very difficult if there are large curves. |
|
|
|
|
JimC
Really should get out more

Joined: 17 May 04 Location: United Kingdom Online Status: Offline Posts: 6649 |
Post Options
Quote Reply
Posted: 10 Sep 07 at 1:51am |
|
Nasty... I'm afraid looking at that I'd be astonished if the inner layer of ply is good. How to approach this depends on whether its above or under the bow tank. Either way I'd take off the damaged layers of ply - no need for a router, you can do this nicely with a stsanley knife, a very sharp chisel, and patience. Take out each successive layer to about 20mm smaller. Presumably its 3 ply: we know the outer layer is no good and I imagine the middle one is too. The inner one you'll see.
Anyway, if we assume that the inner layer is OK then what I'd do is to trim back the middle layer and replace it with a few layers of very thin glass (try a aviation model shop!). Wood might be more elegant, but you need to have a good deal of experience to use it there to get the heights just right. The glass wants to be thick enough to be level or just a tad lower than the outer layer of ply. It must not be higher! Now replace the outer layer. I'd use light plywood from the model shop. Glue in in with epoxy and microballoons. It will end up a bit proud of the main surface I expect, so just sand down flush, then repaint. If the inner skin is broken then you need to deal with that too. If its not too bad, and above the the tank so you have access, then maybe a couple of layers of the light glass on top will be enough. If its in the tank its more trouble. The thing to do is to cut back the ply so you have a hole into the interior. The hole must not be round. Oval about twice as long as high is good. Now make a piece of the very light ply that will cover the hole completely with a good overlap. Drill a hole right in the middle of the ply and put a piece of line through it. This enables you to not lose it! Mark on the inner surface where it should align with the hole, coat the mating surfaces with epoxy/ microballoons/ microfibres, post it through the hole and use the line to pull it into place. Match up the marks so its located right, and rig something up to hold it in place while it cures. When cured remove as much string as possible and then proceed as above. Edited by JimC |
|
|
|
|
landlocked
Far too distracted from work
Joined: 06 Oct 06 Location: United Kingdom Online Status: Offline Posts: 222 |
Post Options
Quote Reply
Posted: 10 Sep 07 at 9:51pm |
|
There is no inner layer, this is a hull built in 1978 it is simply a 2.5-3mm (Max) single ply skin no foam no seond layer just one layer of ply. What i'm thinking is to flex the wood along all the cracks and get it knitted together as good as i can, then fit a sheet of ply (same thickness) behind with epoxy and a big fillet at the bottom along the top of the boyancy tank to help it keep the curve which is only very light then sand down from the front and skim with filler and sand down to a smooth surface, then repaint.
P.S. the crack go right through. Edited by landlocked |
|
|
Cherub 2535 "Eggbert the Nasty" Soon to be for sale PM for Details
Cherub 2657 "Slippery When Wet" Don't sail fly Cherub |
|
|
|
|
JimC
Really should get out more
Joined: 17 May 04 Location: United Kingdom Online Status: Offline Posts: 6649 |
Post Options
Quote Reply
Posted: 11 Sep 07 at 6:36am |
|
I'm talking about the three layers of veneer that make up the plywood... If you get in there with a sharp chisel you'll find that you can work along the glue lines and treat them as separate layers. There might be five, but it would be very unusual. You'll also find that the cracking and breakup has partially ocurred across the layers.
Yees you could just put a lump of ply behind, but it gives something of a hard spot and isn't that good a job. Edited by JimC |
|
|
|
|
Merlinboy
Really should get out more
Joined: 03 Jul 06 Location: United Kingdom Online Status: Offline Posts: 3169 |
Post Options
Quote Reply
Posted: 11 Sep 07 at 8:45am |
|
If the crack goes all the way through landlocked, i would just "back some marine ply, to the back of the crack, i would then remove the debrie from the front of the hole sand fill and repaint.
|
|
|
|
|
charlie1019
Posting king 
Joined: 28 Nov 05 Online Status: Offline Posts: 173 |
Post Options
Quote Reply
Posted: 11 Sep 07 at 4:38pm |
|
Bit of car body filler (the green stuff with the fibres in it is best), a bit of paint and it will be as good as new! |
|
|
|

|
Post Reply
|
Page 12> |
| Forum Jump | Forum Permissions You cannot post new topics in this forum You cannot reply to topics in this forum You cannot delete your posts in this forum You cannot edit your posts in this forum You cannot create polls in this forum You cannot vote in polls in this forum |
Copyright ©2001-2010 Web Wiz
Change your personal settings, or read our privacy policy