Fixing dagger board chunk
Printed From: Yachts and Yachting Online
Category: General
Forum Name: Repair & maintenance
Forum Discription: Questions & tips on the subject
URL: http://www.yachtsandyachting.com/forum/forum_posts.asp?TID=6494
Printed Date: 14 Aug 25 at 10:02am
Software Version: Web Wiz Forums 9.665y - http://www.webwizforums.com
Topic: Fixing dagger board chunk
Posted By: zailor
Subject: Fixing dagger board chunk
Date Posted: 27 Feb 10 at 2:28pm
|
How or what product do I use to repair a Dagger Board with a chunk missing on the trailing edge? Its a CII one and I think its made from Epoxy? or a GRP foam sandwich, or whatever it is...you can tell I have no idea what i'm doing. I have got a new one but fixing the old one would be good for spare/training. |
Replies:
Posted By: tgruitt
Date Posted: 27 Feb 10 at 2:50pm
|
Can you let us know how big the chunk is that's missing, do you still have it?
------------- Needs to sail more... |
Posted By: zailor
Date Posted: 27 Feb 10 at 2:53pm
|
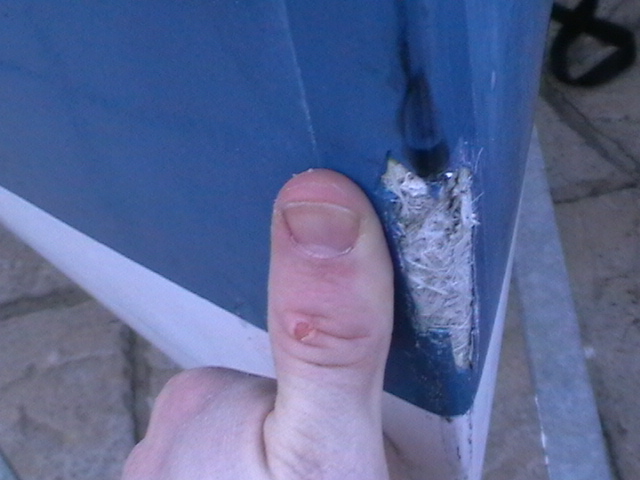
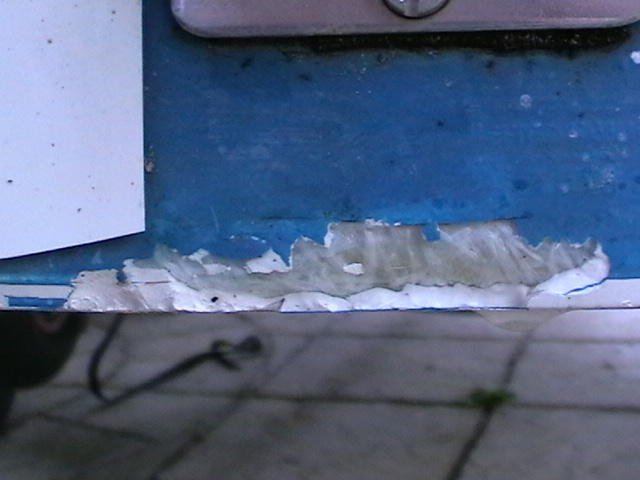
Chunk is missing its about 3inches high and round 1inch into the board. A Knee came down on its trailing edge after sliping trying to rite the boat. Also I have a few holes and cracks in my europe hull (im making myself sound like a boat vandal) is this the right stuff to fill gaps and holes? http://shop.pinbax.com/index.asp?selection=detailed&uid=32398 - http://shop.pinbax.com/index.asp?selection=detailed&uid= 32398 |
Posted By: Merlinboy
Date Posted: 27 Feb 10 at 3:01pm
|
Take a photo of the board and the damaged area mate, then post it on here and i'm sure we could help, same with your Europe hull issues. ------------- |
Posted By: dave.blakesley
Date Posted: 02 Mar 10 at 11:35am
|
Depending on how big the hole is:
If a largish hole (large enough that if you just used filler it would end up needing to be repaired in the near future) - Find something to reinforce the repair, screws work well or lollypop sticks! (Make suer you remove the head of the screws so they wont be sticking out the side!! - Key surface using either a file or rough sandpaper. Take away some of the edge of the damage to help the filler to bond - Clean with acetone to remove dust and grease from the surface (nail polish remover if you cant get proper acetone) - For the first section of the repair use something like P38 (availiable from halfords or all good car body shops). Use it to fill as much of the repair as possible and then use tape (preferably duct) to help it to fit to the existing profile. (Theres 2 ways you can go from here) EITHER: - Sand back the p38 until it is just below the top surface of the board, and then add a layer of gelcoat to the top in order to blend the repair in properly OR - Keep the p38 as the top layer and use a car body spray paint + primer to blend the colours and add a layer or protection That would be my way of doing it to a knackered board, im sure somebody is bound to pick holes in it or have better suggestions! Few tips:- When finishing the board, use wet and dry, not ally oxide paper, and work your way up the grades until you get a very smooth finish. You can then use a polishing compound to make it look new again (i recommend flavela G6 followed by G3, and if you want to be really anal about it a coat of wax/or polish as well!) - If the hole isnt large enough to warrant any kind of screws or supports, dont worry about adding any additional support, the filler will be strong enough. ------------- |
Posted By: BarnsieB14768
Date Posted: 02 Mar 10 at 12:39pm
|
Hi, no probelm Assume the board has a foam core. Get 2 flat none distortable say 6 x 3 inch pieces of material and cover on one side with parcel tape. You will also need 2 clamps. The clean back to a fresh surface and make sure very dry. If you have a thin strip of laminated carbon or glass (epoxy), tel this in to the foam as this will give the trailing edge structural strength. Tape the adjoining surfaces of the board to protect against overspill. Then mix up epoxy with fibres only, till it starts to go sticky. Tape the two plates in place loosely so now seepage down wards can occur. Now plaster the area that has to be replaced. Gently clamp together the two plates. with the trailing edge vertical and leave to dry. Once dried, use stanley knife blades to trim down the proud area and a sharp medium file for the trailing edge (suggest laying a batten along the edge to check the curve). Then finally finish with wet and dry to 1200 grit and a blade on the trailing edge to remove the file's course cut. Have repaired many boards this way over the years. If you can post cure or place in the sun. Have fun  |
Posted By: BarnsieB14768
Date Posted: 02 Mar 10 at 12:41pm
Do not use paint as it can be really bad if you later score the board Use the gelcoat method if looking for a pretty finish Use the gelcoat method if looking for a pretty finish
|
Posted By: dave.blakesley
Date Posted: 02 Mar 10 at 1:20pm
|
Good point forget to mention that barnsie reminded me of - Dont use a heat gun or fan heater to cure gelcoat/epoxy/resin/anything, will mean more work in the long run and a weaker repair. ------------- |
Posted By: zailor
Date Posted: 02 Mar 10 at 5:37pm
|
Hi.
Anyway I hope they work
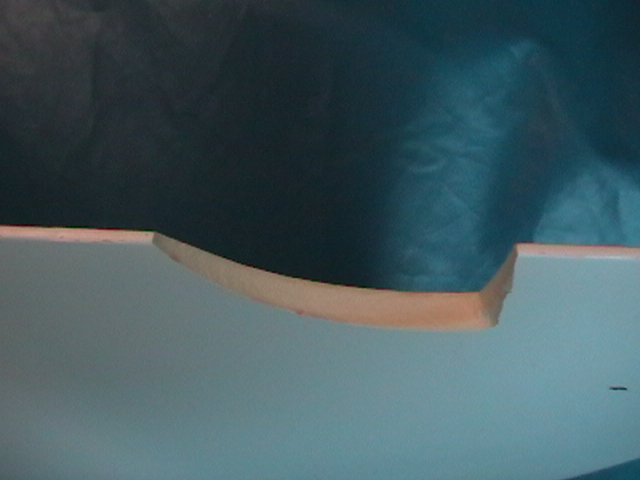
Bow^
Transom^
|


Posted By: dave.blakesley
Date Posted: 03 Mar 10 at 9:29am
|
That bow and transom could be done with standard colour matched gelcoat filler, making sure the surface is well prepared in the same way you'd key the surface of the daggerboard. Make sure you acetone to remove the grease and dust and then sand back using different grades of wet n dry, i recommned 240 - 400 - 800 - 1200 - 1500 ------------- |
Posted By: Rupert
Date Posted: 03 Mar 10 at 9:46am
|
The centreboard looks like a shark got to it! The advice on mending it looks spot on to me. ------------- Firefly 2324, Puffin 229, Minisail 3446 Mirror 70686 |
Posted By: JimC
Date Posted: 03 Mar 10 at 10:27am
Um, not necessarilly. All these materials have an optimum range of temperature to cure properly. If it takes a fan heater and a "tent" to keep it at the right temperature than that's what you need to do. You shouldn't blast a heat source straight at the curing material so its way over temperature instead of under, but you do need to keep the air temperature in range. |
Posted By: I luv Wight
Date Posted: 03 Mar 10 at 11:03am
|
Epoxys work best with a room temperature cure ( at least overnight or a day or so ) and then a high temperature post-cure. Normal boatbuilding resins (SP sicomin west etc) cooked at 60°C for a few hours is so much better. Masts ( and boats if you have the cash ) made with prepregs are cooked at 120°C ish - that's why they don't go soft in the sunshine. ------------- " rel="nofollow - http://www.bloodaxeboats.co.uk" rel="nofollow - http://www.bloodaxeboats.co.uk Andy P foiling Int Moth GBR3467 Freedom 21 Codling |
Posted By: dave.blakesley
Date Posted: 03 Mar 10 at 11:30am
Thats pretty much what i meant, dont just blast it with a heat gun or fan heater straight away, use a tent or well heated room! ------------- |
Posted By: zailor
Date Posted: 03 Mar 10 at 5:48pm
|
Will it dry out in the cold? Thanks for the input By the way. |
Posted By: dave.blakesley
Date Posted: 04 Mar 10 at 9:47am
|
It will take a lot longer for the reaction to happen, and any moisture will ruin the repair. The reason for heating it up is to enable it to reach the activation energy faster. Better to leave it in a warm room. ------------- |
Posted By: zailor
Date Posted: 04 Mar 10 at 6:50pm
| so for the europe hull would that gelcoat filler thing I put in a link further up be the right thing to fix it? |
Posted By: womble12345
Date Posted: 05 Mar 10 at 12:10pm
|
I think its the right stuff but the wrong colour, try ringing whoever originally made it and get the right colour. |
Posted By: dave.blakesley
Date Posted: 05 Mar 10 at 12:51pm
|
Normally if you quote the hull number to whoever made the boat they will be able to tell you exactly the colour of gelcoat used, and they will be able to either sell you the pigment for white gelcoat or some pre-mixed filler. ------------- |
Posted By: Rupert
Date Posted: 05 Mar 10 at 3:12pm
|
Or, if you really don't care about colour, car body filler will do the job and keep the water out.
------------- Firefly 2324, Puffin 229, Minisail 3446 Mirror 70686 |
Posted By: zailor
Date Posted: 06 Mar 10 at 8:43am
|
I just want the hole gone, the boats a tad old to worry too much about cosmetics
Many thanks |