600, inside the hull, lots of rotten wood
Printed From: Yachts and Yachting Online
Category: General
Forum Name: Repair & maintenance
Forum Discription: Questions & tips on the subject
URL: http://www.yachtsandyachting.com/forum/forum_posts.asp?TID=5042
Printed Date: 17 Aug 25 at 3:41pm
Software Version: Web Wiz Forums 9.665y - http://www.webwizforums.com
Topic: 600, inside the hull, lots of rotten wood
Posted By: mike ellis
Subject: 600, inside the hull, lots of rotten wood
Date Posted: 06 Jan 09 at 6:22pm
|
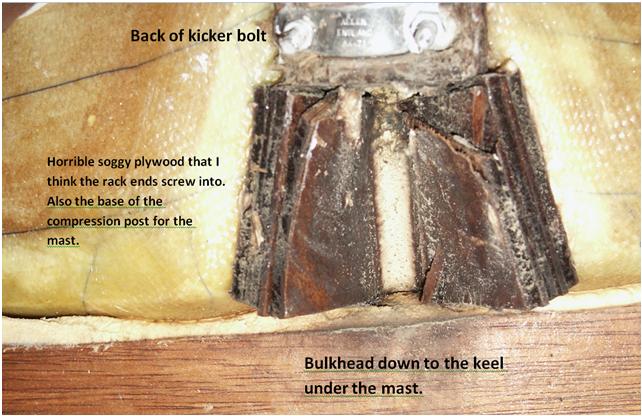
Right here's another one for you... What it shows is the inside of the hull under the mast. The plywood blocks used to attach the rack ends to the hull have gone horribly wet and are falling apart. The block with the kicker bolt in it is from what i can feel not much better but i can't get any pictures to prove it. So any ideas for the best way to get the horrible stuff out and how to replace it?
------------- 600 732, will call it Sticks and Stones when i get round to it. Also International 14, 1318 |
Replies:
Posted By: mike ellis
Date Posted: 06 Jan 09 at 6:33pm
|
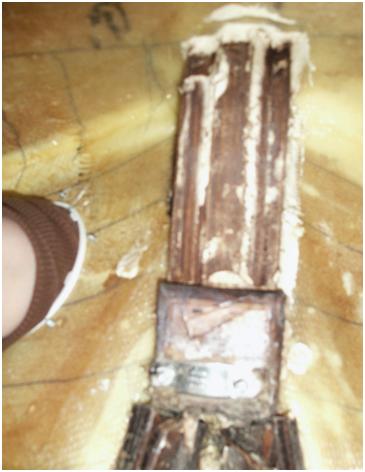
Ok heres some more picturrs of the mast post, I think the long piece of wood is ok, but the bottom piece is very damp.
sorry it's fuzzy but i was just waving the camera around inside the hull hoping.
------------- 600 732, will call it Sticks and Stones when i get round to it. Also International 14, 1318 |
Posted By: JimC
Date Posted: 06 Jan 09 at 7:16pm
|
Ouch!
Access is the killer with these jobs. The theory is simple enough: chisel out the rot, replace with new ply or probably better high density foam pads, reassemble. In practice the bits were probably all assembled with the hull split, and you won't be able to get at anything with acquiring treble jointed rubber arms... Have a chat to RS. If they have no good ideas we can discuss extreme measures, but they don't tend to look pretty afterwards. |
Posted By: craiggo
Date Posted: 06 Jan 09 at 10:48pm
|
From memory those plywood pads only take the lateral wing loads, and they are shared with the rudder post anyway so its not terminal by any means.
The vertical load bearer is in the middle of that mess and is foam sandwhich and should be ok. As Jim says access is the problem here. You clearly have one hatch already, suggesting that the kicker bolt has been re-done at some point, so it may require you cutting a hatch in on the otherside so that you can get two arms in there. If you cant do the job through the bulkhead, I would think the only sensible answer is to take a section of the foredeck off, and then lap it back in once the repair is complete. Sounds bad but probably not too expensive a repair. As Jim says talk to LDC or Ashdown Marine before you get the jigsaw out. Paul |
Posted By: mike ellis
Date Posted: 07 Jan 09 at 4:38pm
|
yes the kicker bolt has been re-done once already, that was why i had the camera in the hull. I refitted the kicker bolt earlier in the summer when it went bang after a race. However the holes in the hull had worn a lot so it wasnt a very good seal. I was trying to estabilsh what was behind it so i could come up with a plan to make a better job of the repair. I shall now get on the phone to LDC. ------------- 600 732, will call it Sticks and Stones when i get round to it. Also International 14, 1318 |
Posted By: Jimbob
Date Posted: 08 Jan 09 at 12:07am
|
2 years ago when I fixed the kicker fitting, I found that the bolt ends went through the hull and a thickish piece of wood on the inside, which had worn down a bit and was damp due to leakage through the loose fitting. There was nothing else there. I did what you or whoever fixed your fitting did,ie I put a metal plate over the wood so I could tighten new locknuts hard against the plate, wood and hull.
I also replaced the mast foot 5 years ago which had been ground away by the metal plate and screws coming loose. I used epoxy filler to fill the screw holes and make up the foot and drilled new holes for the screws offset from the old holes. Then used gel coat filler to finish. I have had no problems with either of the two repairs since. Hope this helps ------------- Jimbob |
Posted By: Jamie600
Date Posted: 08 Jan 09 at 12:25pm
|
Mike, Just offering a glass-half-full view; could the ply just be damp and peeling on the outer layer rather than rotten all the way through? Your boat hasn't fallen apart so it's probably OK, and perhaps not worth spending a fortune cutting the boat open and repairing it potentially for no reason. I'd get the boat in a garage with a heater and dehumidifier and get the boat fully dried out, and concentrate on getting it water tight to stop any further problems and then see how it goes.
------------- RS600 1001 |
Posted By: mike ellis
Date Posted: 08 Jan 09 at 5:21pm
|
I'm working very hard on the watertight thing at the moment, that's the reason I've come across this. I called LDC today and they came up with what seems like a very sensible suggestion to get the wood off and replace it without making huge holes in any part of the boat. First mark up very carefully where all the current fittings are and how big and where the lumps of ply inside the hull are. Next carefully use a dremnel to get the glass fibre out from around the lumps of wood, but leaving some glass in where the wood is. Now use a large punch and a hammer to remove the old ply from the inside of the hull, then collect the pieces from inside the hull. After that it should be just a case of making up new ply/foam blocks to replace the old ones, position them, and fix them in place with epoxy and string through the hull until the epoxy sets. Finally, rebuild the holes around the edges of the wood that i took off earlier and replace the fittings. How does that sound to you lot? ------------- 600 732, will call it Sticks and Stones when i get round to it. Also International 14, 1318 |
Posted By: JimC
Date Posted: 08 Jan 09 at 5:48pm
It all depends on how good you are at not losing your temper whilst working inside a confined space etc... I can think of two qualified professions, one being a dentist: I'll leave the other to your imaginations... It sounds feasible given time and care and patience. |
Posted By: Jimbob
Date Posted: 08 Jan 09 at 5:53pm
|
"How does that sound to you lot"
No way Jose! ------------- Jimbob |
Posted By: mike ellis
Date Posted: 08 Jan 09 at 6:53pm
|
I prefer the idea of only making small holes in the boat and fiddling around with string and stuff to line it all up to the alternative of making a gaping great hole in the foredeck. That just seems wrong to me (even though it will probably be easier to get to the inside of the boat like that). ------------- 600 732, will call it Sticks and Stones when i get round to it. Also International 14, 1318 |
Posted By: Ross
Date Posted: 08 Jan 09 at 8:17pm
|
What ever you do, do it right first time! ------------- Ross If you can't carry it, don't sail it! |
Posted By: craiggo
Date Posted: 08 Jan 09 at 11:39pm
|
Fiddly but possible.
Let us know how it goes One thing I have learnt in repairing my boats is that often the easiest way of making a small repair is to remove an unfeasibly large area around the damage and re-build it. This is often less fiddly and quicker in the long term. |
Posted By: Stevie_GTI
Date Posted: 09 Jan 09 at 2:14am
|
a lot of people get carried away with how difficult they think cutting a big hole in a boat and repairing it is. Best thing to do is just not be shy, but make sure you tilt the jig-saw blade the correct way or you will have issues. I'm guessing that when you spoke to LDC that advice will have come from miller, and i would trust what he says to do. When you replace the blocks of wood, it is a good idea to paint them in resin, therefore sealing them from any water which may get into the boat and preventing any rotting. personally, i would just cut a big hole out so i could get in there, get rid of all the dead wood and replace it all, then do the hole repair. |
Posted By: mike ellis
Date Posted: 09 Jan 09 at 6:52pm
|
alright seeing as many people are suggesting the make-a-really-big-mess-to-fix-a-smaller-one solution, how do you go about mending a large hole that you've made in the foredeck? What can you use to layer the glass against whilst it's drying? And how do you form this into a near-match to the shape of the old foredeck? ------------- 600 732, will call it Sticks and Stones when i get round to it. Also International 14, 1318 |
Posted By: ratface
Date Posted: 09 Jan 09 at 7:41pm
|
mike i believe you 'stick' the area of the deck you cut off back on, hence tilting the jig-saw the correct way? *edit- bad grammar* ------------- http://www.blym.org.uk/ - BLYM http://www.blym.org.uk/hydrs/index.htm - Hertfordshire Sailing team Uk-Cherub 2644 Laser 4000 -4089 |
Posted By: craiggo
Date Posted: 09 Jan 09 at 10:42pm
|
Alternatively if your a bit lively with a jigsaw, once you have the area cut out, epoxy in some lap joints on all four edges (assuming you've cut a rectangle out). They dont have to be full length, just enough to support the cut out section when you put it back. Once you've finished the fiddly repair inside then bond the cutout piece onto the lap joints and then dremel a bit of a 'v' along the interfaces and fill with matched gel-coat.
Or give it to LDC or Ashdown Marine to sort out 
|
Posted By: Stevie_GTI
Date Posted: 10 Jan 09 at 3:31am
|
cut out your shape, easiest shape is a circle in my opinion. you need to tilt the blade so that when you have cut the shape out you can sit it back over the whole. (from the top of the blade to the bottom, the blade points towards the centre of the whole).Its best to draw a circle first and then make some marks on it so you know which orientation if fits back on. Then do your repair work in the inside of the hull. And to attach the cut out shape back, mix up a thick epoxy bog mix (bubbles, silica, microfibres), and apply a good amount to the edges of the shape, and the hole. Then position the shape into the hole and push down gently so the mix oozes out, trying all the time to get the shape in the exact correct place so it is fair with the hull. Let this mix go off fully.Use a long straight edge to assist with this. Then you will need to grind the gel-coat and a small bit of laminate away around the join, you need to be carefull you dont go into the core. Probably looking at a 40mm with of ground back area all the way around the join. You will then need to put 2 layers of glass over the area(only wet out the bits in the ground off area though!!), make sure this is consolidated well, and then peel ply over the top, if you have the facilities then vac this stage down. When that has gone off you need to sand the laminate so it is nice and fair and slightly below the height of the rest of the hull. Once you are happy with the shaping, it is the gelling stage. Providing all the previous stages went well the gel should be pretty easy. Apply the gel to the ground back circle (may need a couple of layers), and finish off by sanding through the grades and polishing.
Hope this helped |
Posted By: mike ellis
Date Posted: 10 Jan 09 at 3:09pm
|
Ok, I think I could probably manage the big-hole-in-the-foredeck method but I don't trust myself to put it back together neatly enough so I'm going to try doing it the fiddly way that RS suggested and if it all goes horribly wrong then I'll use a big hole in the foredeck to fix it but only if I really have to. ------------- 600 732, will call it Sticks and Stones when i get round to it. Also International 14, 1318 |
Posted By: Jamie600
Date Posted: 12 Jan 09 at 10:25am
|
You could cut the hole and do the repair yourself to keep the cost down but then get LDC to do an invisible repair ------------- RS600 1001 |
Posted By: mike ellis
Date Posted: 21 Jan 09 at 6:28pm
|
Just an update, I've been held up by having to do revision for exams but I've finally got most of the old manky ply wood out the inside of the hull (no big hole in the foredeck yet). And it was very old manky plywood, I put a great big lump of wood just inside the hole i made and hit it with a lump hammer and it went straight through the ply. Now I'm trying to get the last little bits of wood unstuck so I can fit the new lumps of hardwood and put the glass fibre back on. ------------- 600 732, will call it Sticks and Stones when i get round to it. Also International 14, 1318 |
Posted By: ColPrice2002
Date Posted: 25 Jan 09 at 6:22pm
|
Mike,
Just a thought, from experience I would suggest that your hardwood should be well epoxied (first) and I wouldn't suggest mahogony (apparently it doesn't like fresh water...)
Colin |
Posted By: mike ellis
Date Posted: 26 Jan 09 at 5:49pm
|
Thanks, I have some old window frame which I am going to use, I haven't got a clue what tree it came from but I'm sure it will be fine once it's properly coated in epoxy. (I sail on the sea anyway and don't intend to spend long periods of time puddle sailing in the near future anyway) ------------- 600 732, will call it Sticks and Stones when i get round to it. Also International 14, 1318 |
Posted By: Fin.
Date Posted: 28 Jan 09 at 9:15pm
|
do a little research.... some hardwoods are oily, so I've a feeling epoxy may not stick so well to it.... .. worth looking up "west" or '"SP" epoxy websites. one of them's got a load of info.
|
Posted By: mike ellis
Date Posted: 29 Jan 09 at 5:44pm
|
Hmmm the plan has changed again now anyway. Due to the shape of the inside of the hull where im trying to fix the wood, it is really hard to cut it to the right shape. So i have decided to go for either a piece of sheet metal (probably stainless steel but aluminium if I can get it) glued on the back and then bolt through it. Failing this I will make up some thick glass laminate, with lots of bog between it and the hull, and try to screw through this. I am already going for the sheet steel or aluminium approach to back the kicker bolt with once I've got the old wood off that so this is probably what I'll do here as well. I'll just have to be careful about disimilar metal corrosion i suppose. ------------- 600 732, will call it Sticks and Stones when i get round to it. Also International 14, 1318 |
Posted By: craiggo
Date Posted: 29 Jan 09 at 10:58pm
|
I think I'd rather keep trying with the wood rather than sticking metal in there. Even if you go for 316 stainless it will still corrode and you'll probably end up with leaching rust stains all over your boat. Ali will probably fur up and then dissolve. Id be more tempted to stick a piece of peel ply in there with some release wax and then with a few layers of glass make up a plug. Take the plug out and then take a splash off the plug and shape the wood to fit.
Any boat builders got any other advice ? |